Integrate with Sanity
Learn how to integrate Mux video with your Sanity studio. If your team is using Sanity as a CMS this integration will allow them to upload videos to Mux without leaving the Sanity studio.
Prerequisites
This guide assumes you already have a Sanity Studio set up. If you haven't created your Sanity Studio yet, follow the Sanity Studio quickstart guide to get started.
1. Install Mux plugin
Run this command in your Sanity project folder:
npm i sanity-plugin-mux-input2. Use in a schema
To use Mux video in your Sanity schemas, you'll need to create a schema type, import it to your schema types index, and configure the Mux plugin in your Sanity configuration file.
2.1. Create a schema type
Create a new file in your schemaTypes directory (or schemas directory, depending on your setup). For example, create a file called videoBlogPost.ts:
// schemaTypes/videoBlogPost.ts
import { defineType, defineField } from 'sanity'

export default defineType({
  title: 'Video blog post',
  name: 'videoBlogPost',
  type: 'document',
  fields: [
    defineField({
      name: 'title',
      type: 'string',
      title: 'Title'
    }),
    defineField({
      name: 'video',
      type: 'mux.video',
      title: 'Video file'
    })
  ]
})
2.2. Import the schema type
Import your new schema type in your schema types index file (usually schemaTypes/index.ts or schemas/index.ts):
// schemaTypes/index.ts
import videoBlogPost from './videoBlogPost'

export const schemaTypes = [videoBlogPost]
2.3. Configure the Mux plugin
Add the Mux plugin to your Sanity configuration file (sanity.config.ts or sanity.config.js):
// sanity.config.ts
import { defineConfig } from 'sanity'
import { structureTool } from 'sanity/structure'
import { muxInput } from 'sanity-plugin-mux-input'
import { schemaTypes } from './schemaTypes'

export default defineConfig({
  name: 'default',
  title: 'My Sanity Project',

  projectId: 'your-project-id',
  dataset: 'production',

  plugins: [
    structureTool(),
    muxInput()
  ],

  schema: {
    types: schemaTypes,
  },
})
3. Enter Mux credentials
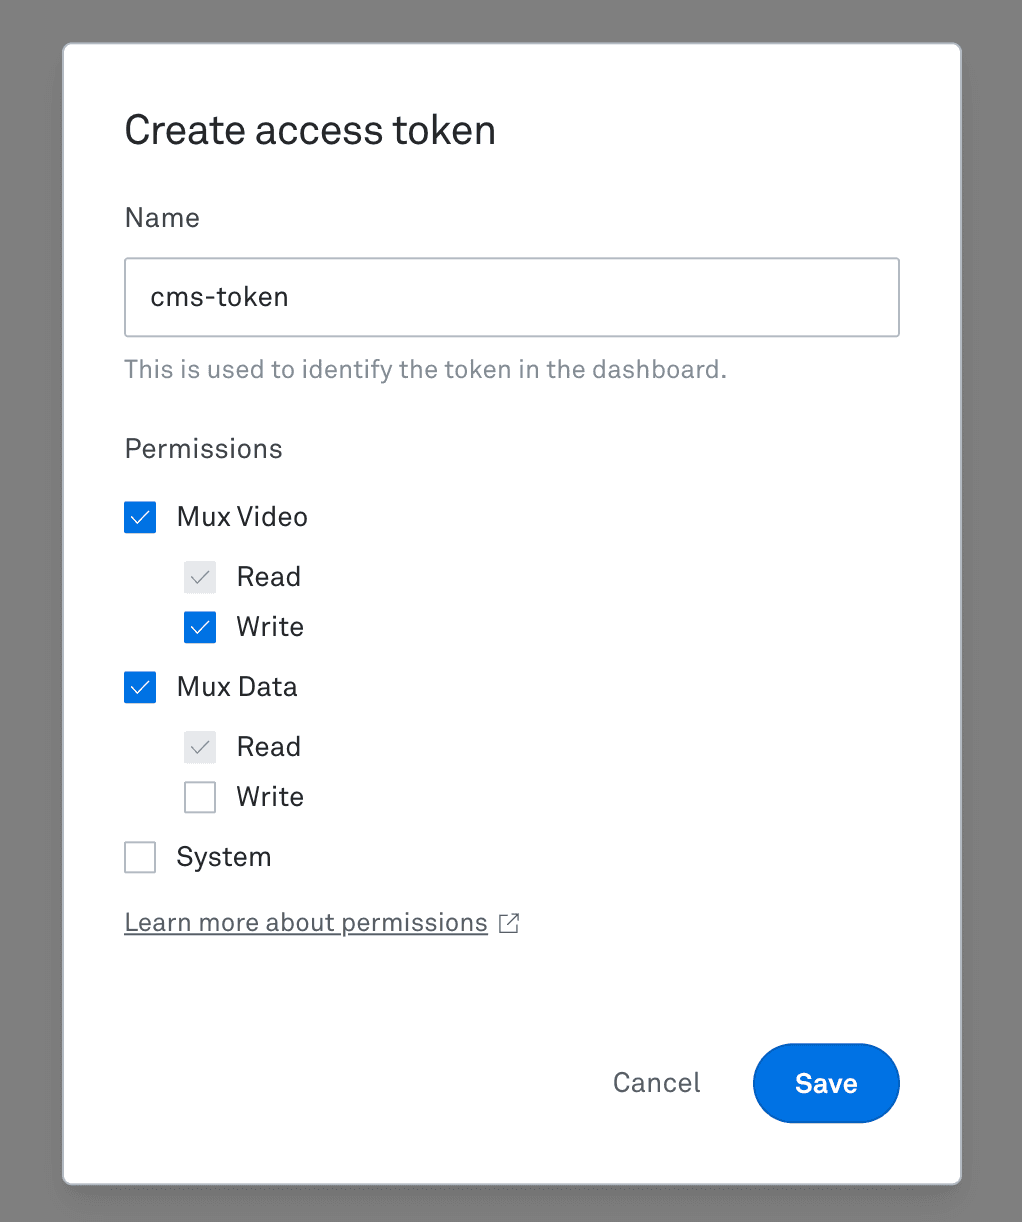
Generate a new Access Token by going to the Access Token settings of your Mux account dashboard.
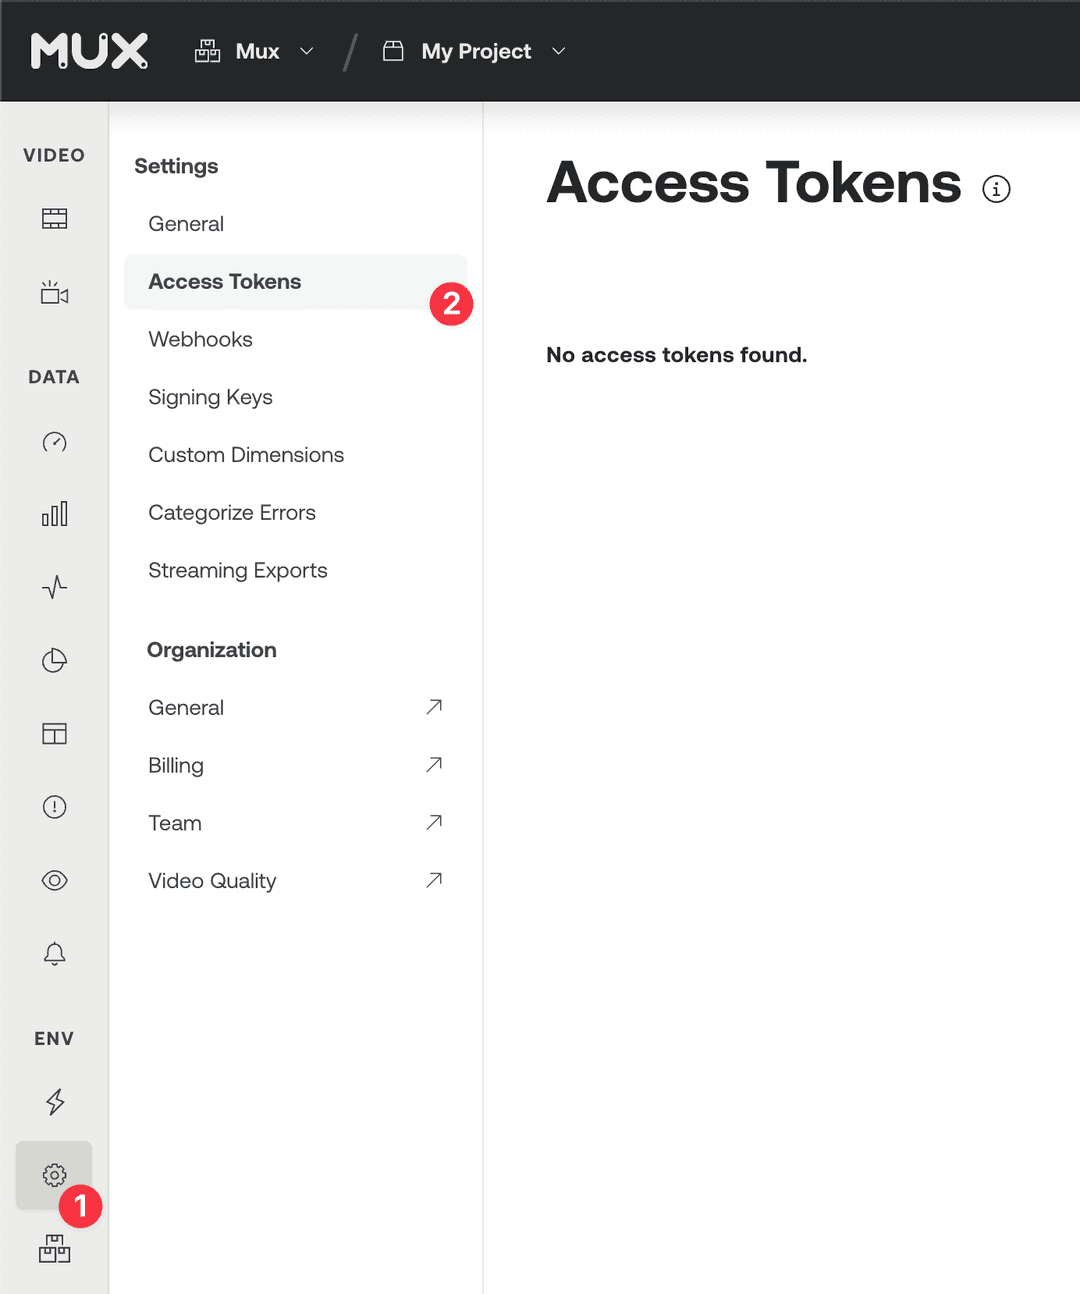
The access token should have Mux Video Read and Write permissions as well as Mux Data (read-only).
If you want to use signed or DRM playback, you need to enable both Read and Write permissions for the System section. For more information, check out the Signed Tokens section.
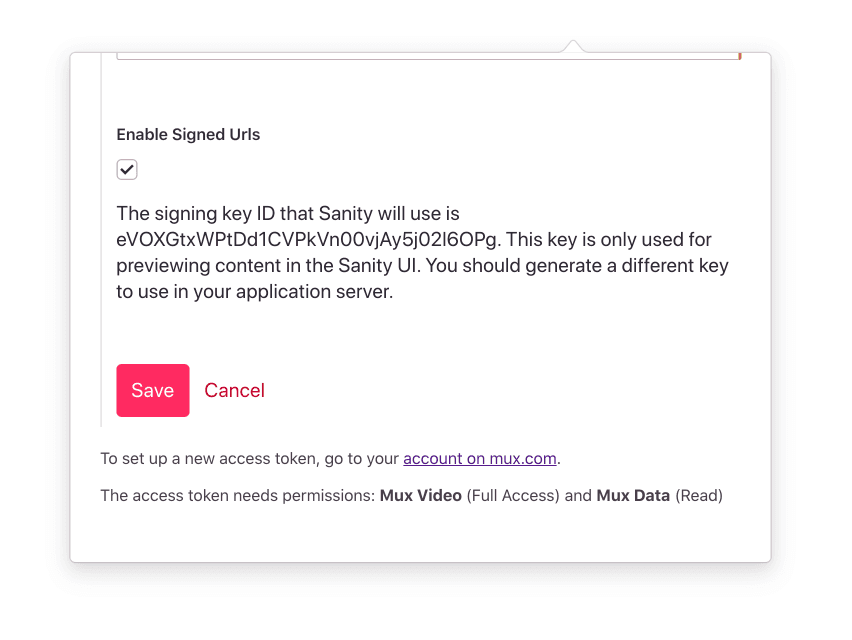
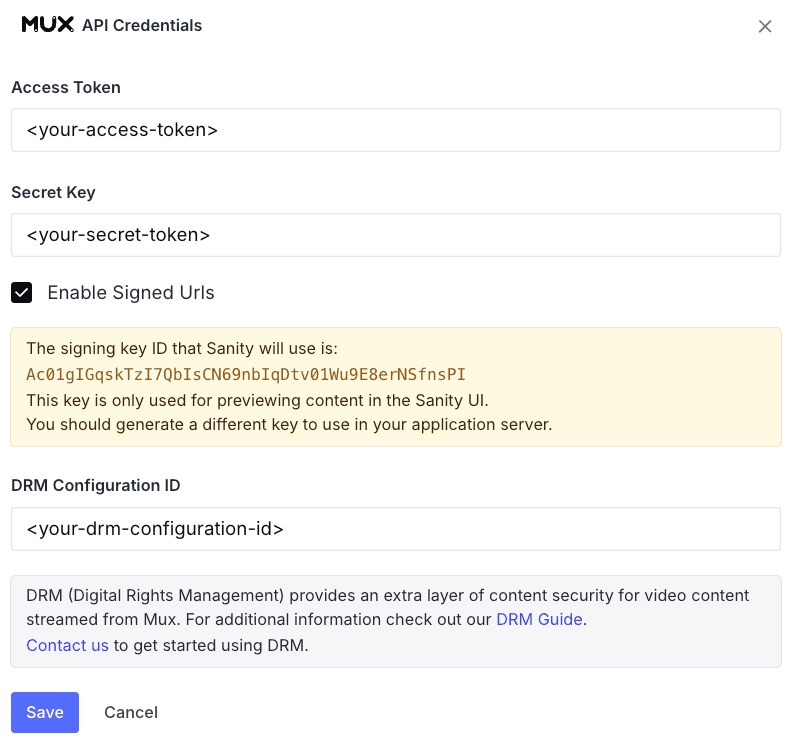
Back in Sanity Studio, navigate to the Videos section in your studio menu, then click on Configure plugin. Enter your Access Token ID and Secret Key in the configuration settings.

You'll also see an option to Enable signed URLs. This feature allows you to create videos with signed playback policies for additional security. If you're unsure, you can leave this disabled for now—you can learn more about this feature in the Signed Tokens section below.
Additionally, you will see an input to add an optional DRM Configuration ID. This feature allows you to create videos with an extra layer of security using DRM. You can learn more about this feature in the DRM section below.
4. Upload video
Use the select button to open the file explorer on your system, drag the file right into the input area, or paste the URL to the video in the field. Once it's done uploading, you can select the thumbnail you want for the preview.
Congratulations!
You now have the ability to upload content to Mux through Sanity CMS!
To retrieve your video for playback, check out the Sanity docs for instructions.
5. Explore advanced options
Signed Tokens
Warning! Requires generating JWT on your server
Enabling signed URLs in Sanity will require you to generate your own signing tokens on your application server. This involves creating a signing key and using that to generate JSON web tokens when you want to access your videos and thumbnails outside of Sanity.
By default, all assets uploaded to Mux through Sanity will be created with a playback policy of "public". This means that your videos and thumbnails are accessible with https://stream.mux.com/{PLAYBACK_ID}.m3u8 and https://image.mux.com/{PLAYBACK_ID}/thumbnail.jpg.
If you want more control over delivery of the playback and thumbnail access, you can enable this feature on the Sanity configuration popover:
When you enable this feature, the following things will happen:
- The Mux Plugin in Sanity will use the Mux API to create a URL signing key and save this with your
secretsdocument. - Any assets that get created while this feature is enabled will be created with
playback_policy: "signed"(instead of"public"). - The signing key from Step 1 will be used by the Mux Plugin to preview content inside the Sanity UI.
- When you access your content in your own application, use the
MuxAsset.data.playback_idsproperty to determine if the asset has asignedorpublicpolicy.
{
  "_id": "0779365f-bbd1-46ab-9d78-c55feeb28faa",
  "_type": "mux.videoAsset",
  "assetId": "fNMFNYMq48EwgJM7AIn1rNldiFBcVIdK",
  "data": {
    "playback_ids": [
      {
        "id": "01cBJKm5KoeQii00YYGU7Rvpzvh6V01l4ZK",
        "policy": "public"
      }
    ]
  },
  "status": "ready"
}- You should use the signed
playbackIdto create URLs for playback and for thumbnail generation.
- Playback
https://stream.mux.com/{SIGNED_PLAYBACK_ID}.m3u8?token={TOKEN} - Thumbnails
https://image.mux.com/{SIGNED_PLAYBACK_ID}/thumbnail.jpg?token={TOKEN}
- The
TOKENparameter for the above URLs is something you create on your server according to Step 2 in Secure video playback
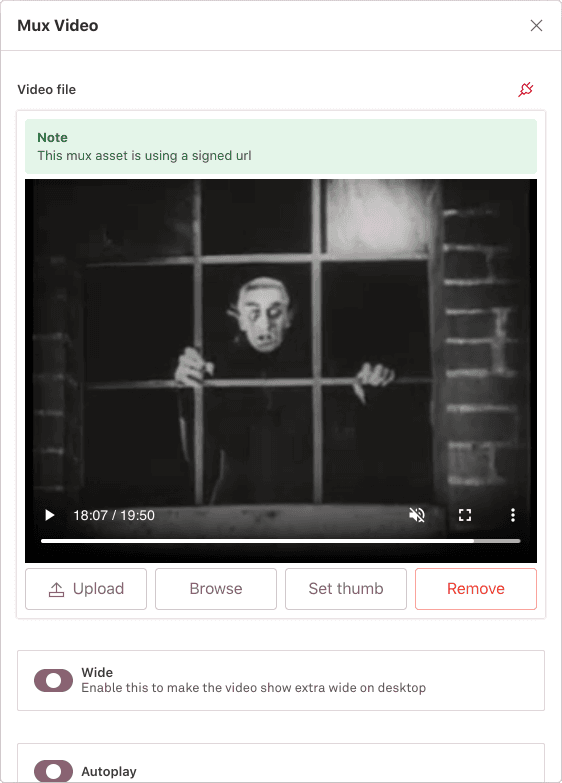
Note that in the Sanity UI when an asset is using a signed URL you will see this green notice.
Digital Rights Management (DRM)
Note: Enabling DRM in Sanity will require you to generate your own signing tokens on your application server. This involves creating a signing key and using that to generate JSON web tokens when you want to access your videos and thumbnails outside of Sanity.
Prerequisites
Before you can use DRM playback policies, you'll need:
- An access token with Read and Write permissions for the System section. See how to do this in step 3.
- DRM support enabled in your Mux account and the respective DRM Configuration ID. You can see the steps to enable DRM for your account in our DRM guide.
To enable DRM on Sanity, simply add your DRM Configuration ID on the configuration popover. If you want to preview DRM-protected content in Sanity, make sure you also enable Signed URLs.
Uploading DRM-protected assets
Once DRM is enabled on Sanity, to upload a new asset with DRM protection:
- Set Video Quality to Plus or Premium
- Look for the DRM option in the Playback Policy section
- Enable the DRM checkbox to upload your asset with DRM protection
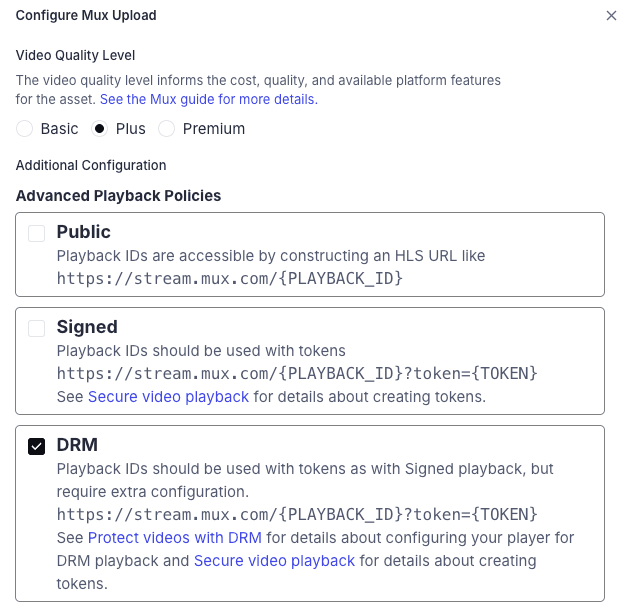
If you don't see the DRM option or it appears disabled, make sure that you're on the latest version of the plugin and you've added your DRM Configuration ID in the plugin settings.
Multiple playback policies
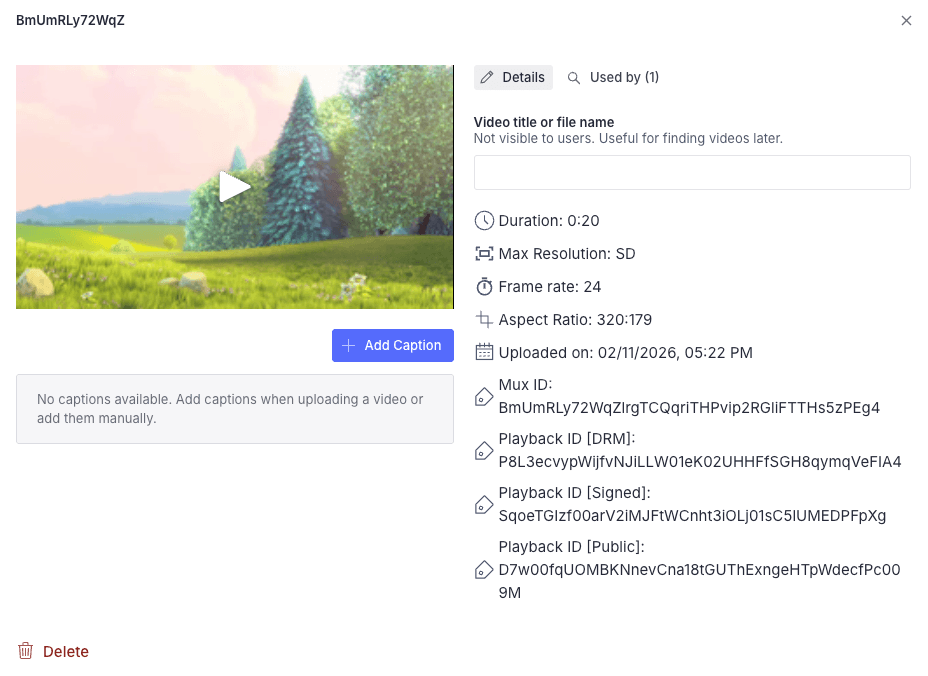
You can select multiple playback policies for a single asset:
- Public: Anyone with the playback URL can view the video
- Signed: Requires a signed JWT token to view the video
- DRM: Protected content that prevents screen recording and screenshots
Combining policies gives you flexibility in how you distribute your content. However, note that when multiple policies are enabled, each playback ID maintains its own protection level. For example, a Public playback ID will remain accessible without protection even if DRM is also enabled.
When viewing an asset's details, the panel displays all selected playback policies for that asset and the corresponding playback ID for each policy.
Viewing DRM-protected videos
Videos tab
In the Videos tab, assets with DRM protection are indicated with a special DRM icon.
- Thumbnails will still be visible (they are not DRM-protected)
- The Sanity video player will automatically use the most appropriate playback policy while displaying the icon for the asset's strongest policy:
- Public playback is prioritized (no additional cost)
- Signed playback is used if public isn't available
- DRM playback is used only when necessary (as it incurs a small cost per playback)
This approach helps minimize playback costs while still indicating the protection level of your assets.
Advanced configuration
Default value for DRM policy
DRM policy is disabled by default. You can use publicDrm: true to enable DRM policy for all new assets.
muxInput({
  // ... other Mux plugin config
  defaultDrm: true
})
Note that this will only apply when a DRM Configuration ID is present.
Disable DRM playback warning
The first time you play DRM-protected content, you'll see a warning message explaining the behavior of DRM playback.
This message is shown only once and tracked using local storage with the key mux-plugin-has-shown-drm-playback-warning.
To disable this warning entirely, you can add disableDrmPlaybackWarning: true to the plugin configuration:
muxInput({
  // ... other Mux plugin config
  disableDrmPlaybackWarning: true
})
Troubleshooting
DRM checkbox is disabled
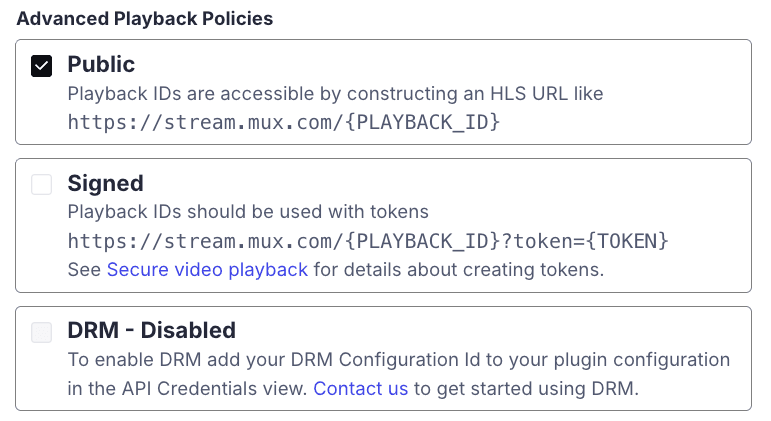
If the DRM playback policy option appears disabled, verify that you've added a DRM Configuration ID in the plugin settings.
Invalid DRM Configuration ID
The plugin doesn't validate your DRM Configuration ID in advance. If you enter an invalid ID, you may encounter errors when attempting to upload DRM-protected assets. Make sure you're using the correct ID from your Mux dashboard and that your access token was created with Read and Write System permissions.
My DRM Configuration ID is set, but I cannot play back DRM-protected content.
DRM playback uses a playback token just like Signed Playback. Make sure that "Enable Signed URLs" is checked in the Plugin configuration popover.
Video quality
Note: We recently renamed encoding tiers to video quality levels. Read the blog for more details.
When uploading a new video, you can select which Video Quality is used when preparing the Asset. Possible selections are Premium, Plus and Basic. When choosing Premium or Plus, additional options are made available for maximum resolutions (1080p, 2K or 4K).
More details can be found in our Use Video Quality guide.
Static Renditions
When using the Plus Video Quality, an option to enable downloadable MP4s will be available. This option will create Static Renditions for the Asset and will make MP4 files available for download to client devices using a formatted URL.
Max Video Resolution
You can specify the maximum resolution to encode the uploaded video. This option is particularly important in managing costs when uploaded videos are higher than 1080p resolution and also allows you to encode and play videos in 2k or 4k resolutions.
More information on the feature is available in our docs. Also, read more on this feature announcement in our blog post.
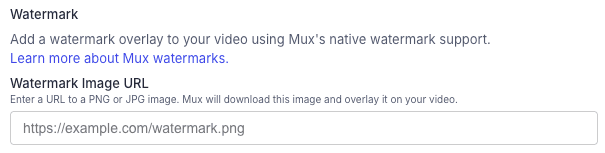
Watermarks
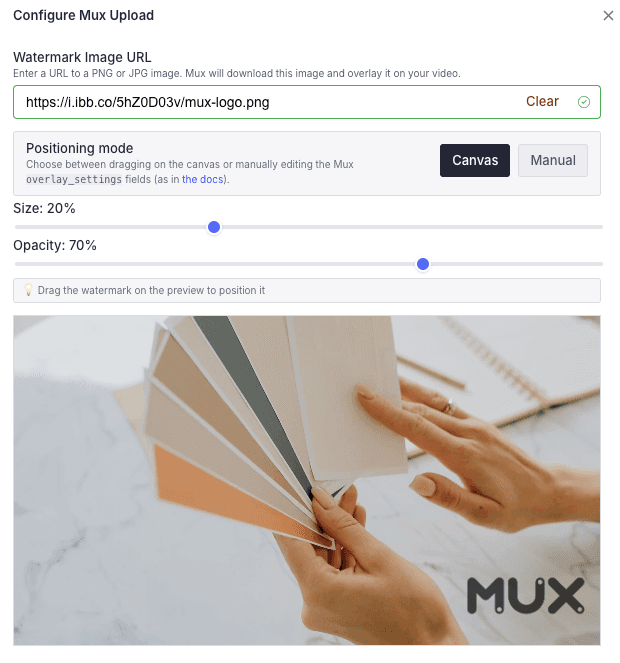
You can add a watermark image overlay to videos uploaded through Sanity. When uploading a new video, the plugin provides a watermark configuration section where you can specify a watermark image URL (PNG or JPG) and customize its appearance.
The watermark settings include:
- Image URL: A URL pointing to a PNG or JPG image to use as the watermark
- Size: Control the dimensions of the watermark on the video
- Opacity: Adjust the transparency of the watermark
- Position: Place the watermark using either a visual canvas-based drag interface or by manually editing the position values
Note: Watermark settings only apply to video uploads. The watermark configuration UI will not appear for audio-only files.
For more details on watermark positioning options (percent vs. pixel values, centering, and multiple watermarks), see the Add watermarks to your videos guide.
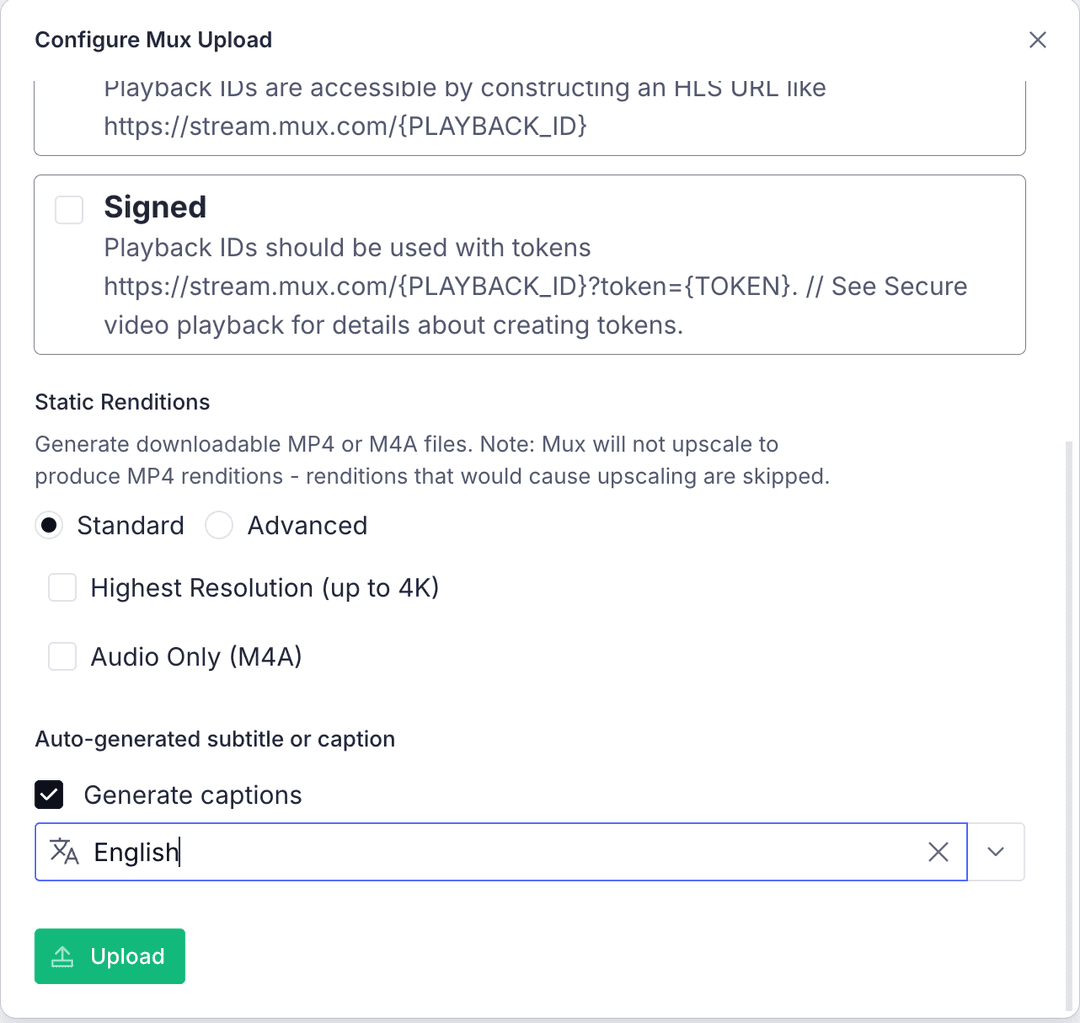
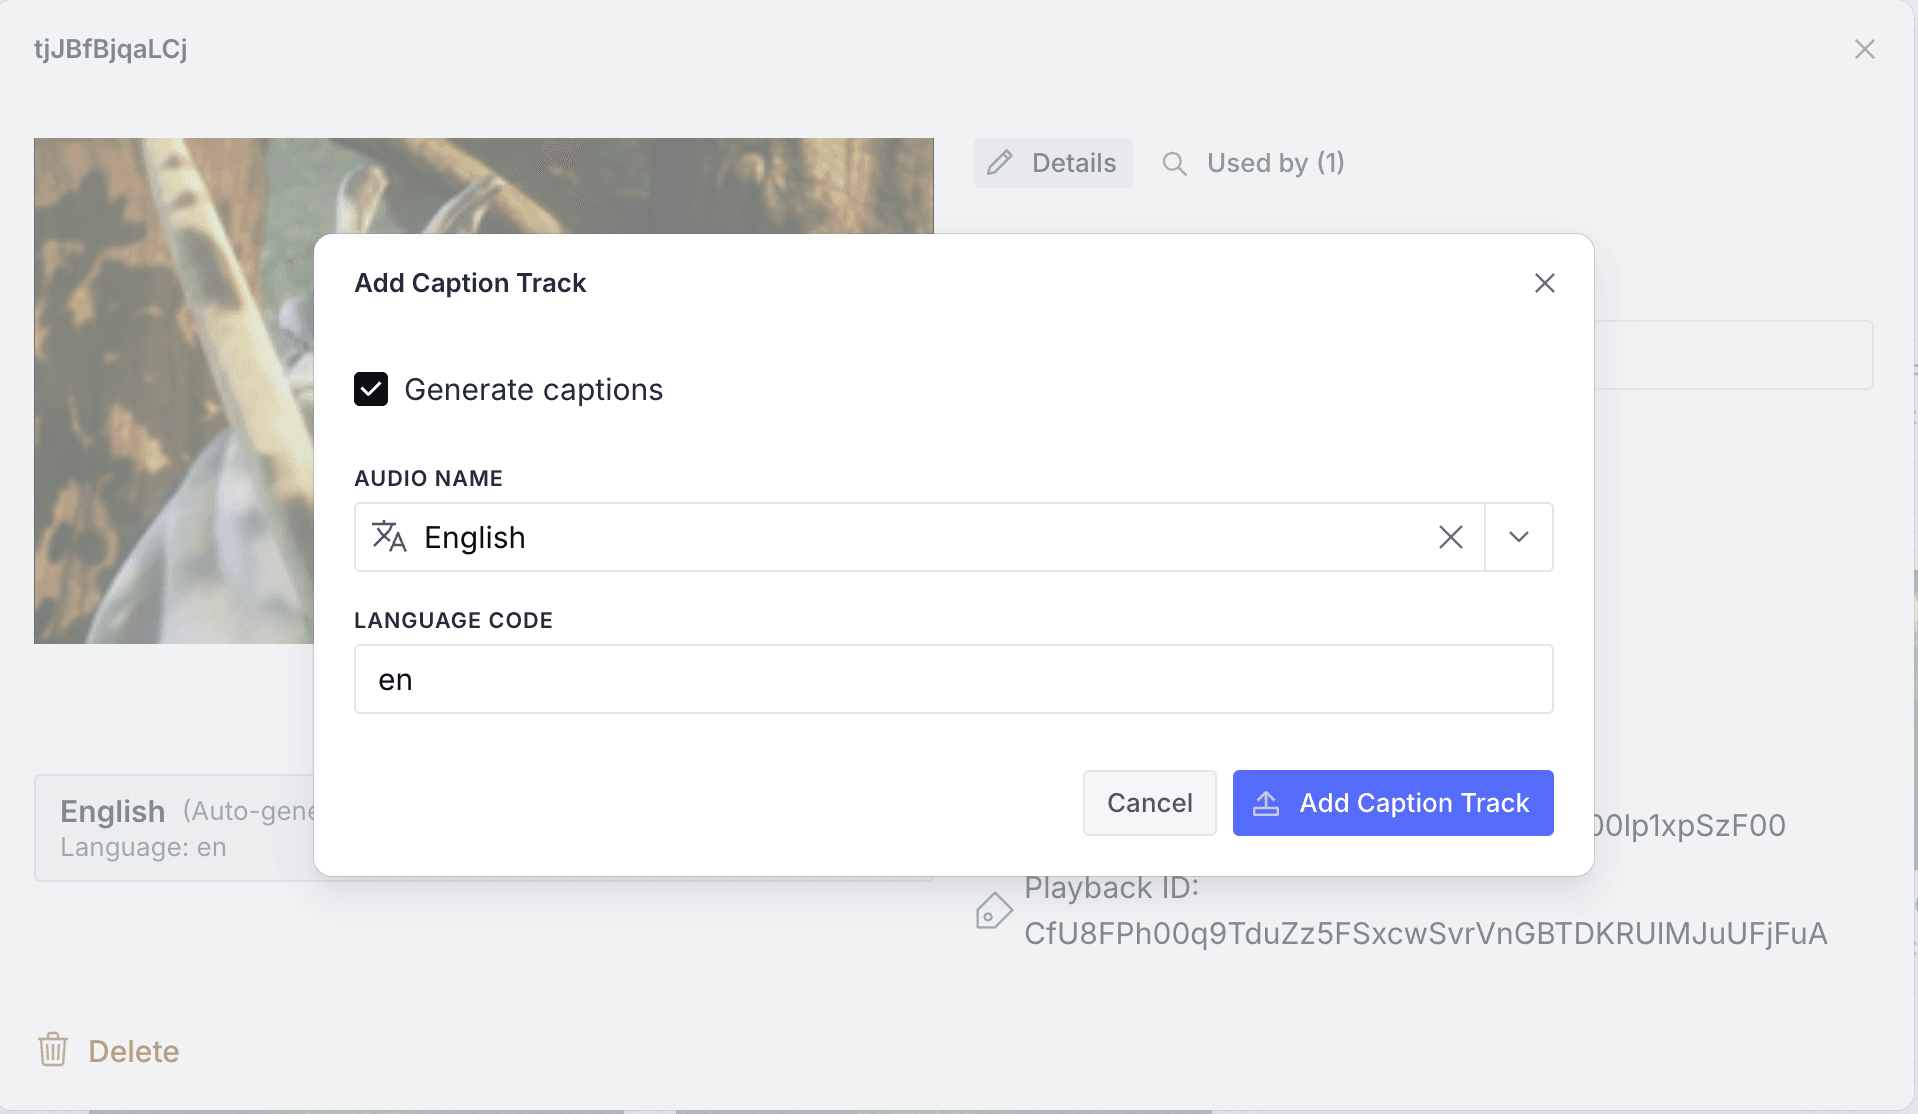
Captions and Subtitles
You can add captions to your videos in two ways: during the initial upload or after the video has been uploaded. Both auto-generated and custom captions are supported, and you can use both types on the same asset.
Adding captions during upload
When uploading a new video, you can configure auto-generated captions in the upload modal before the file is uploaded to Mux. This allows you to set up auto-generated captions right from the start.
Adding captions to existing videos
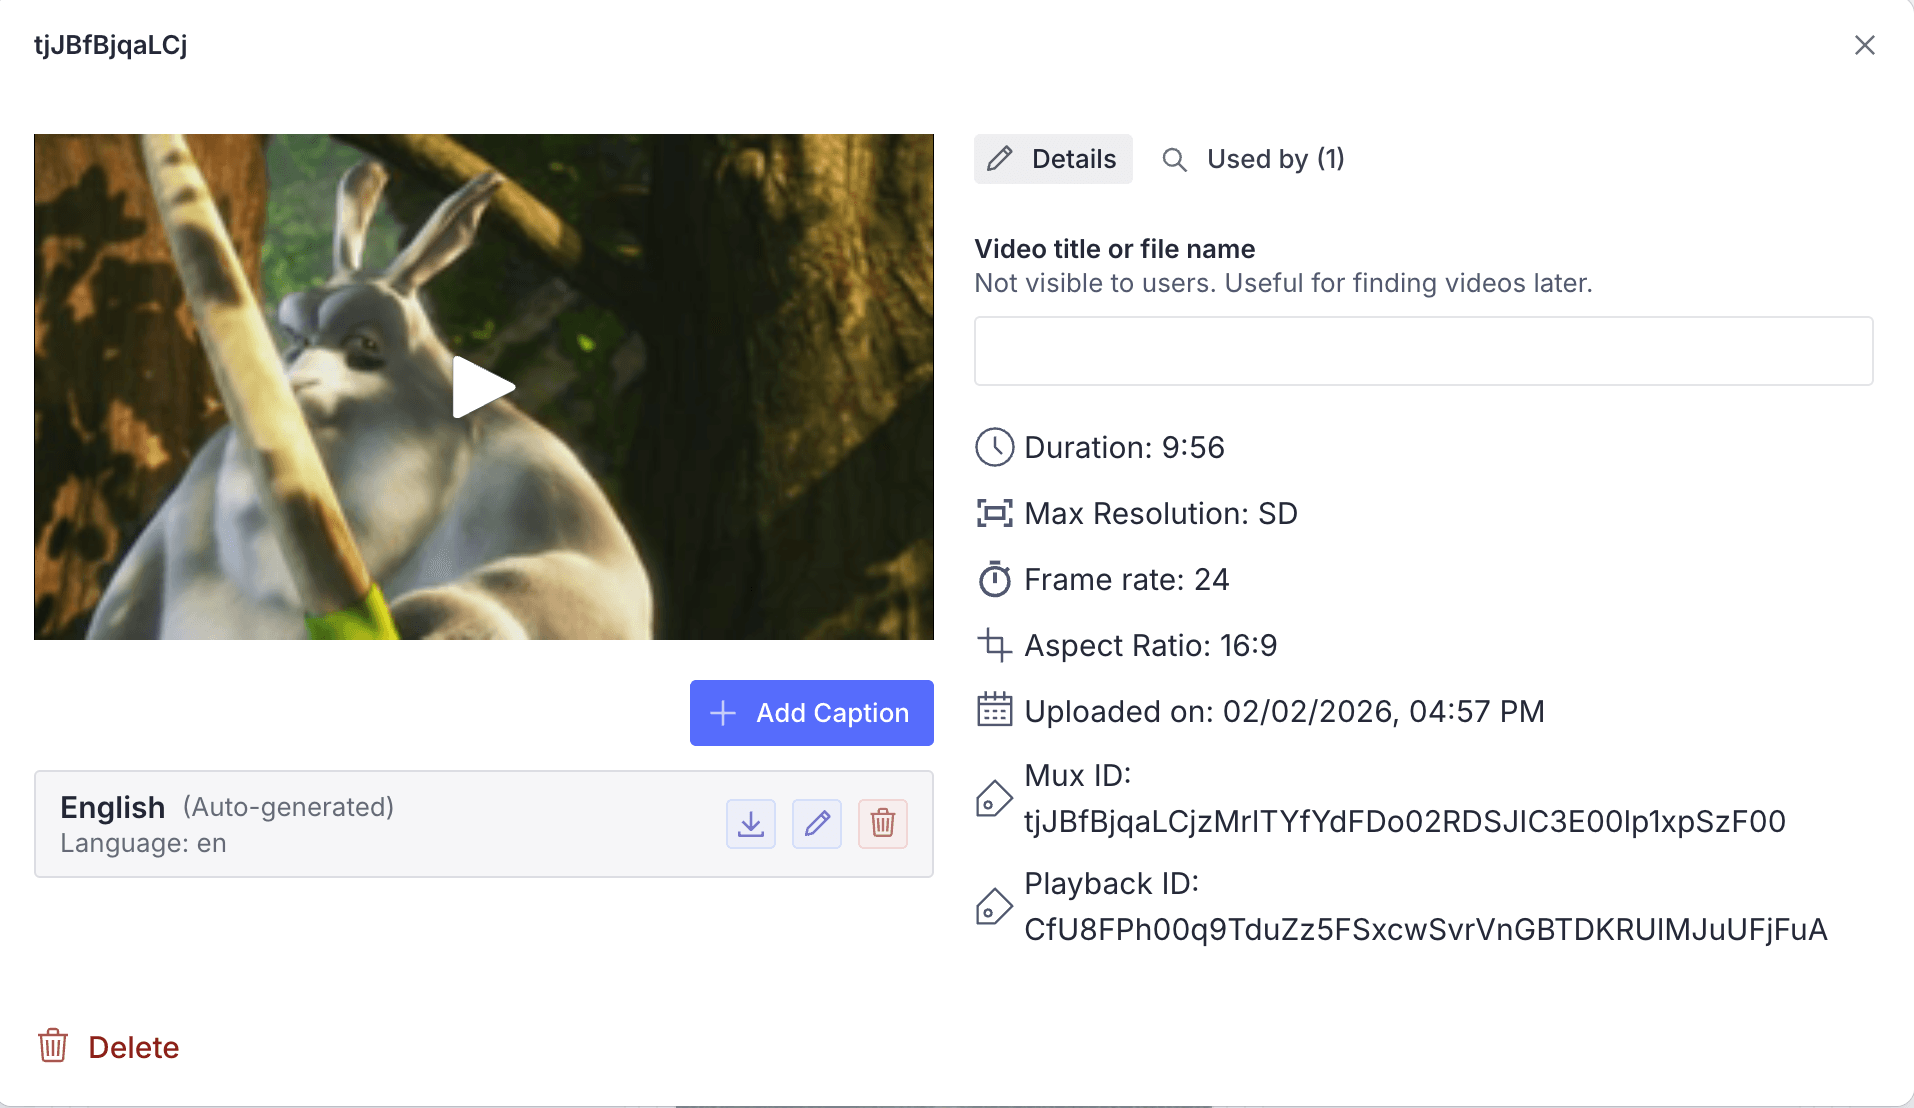
For videos that have already been uploaded, you can add or manage captions in two ways:
- From the Videos section: Go to Videos in your studio menu, find the video in the list, and open it to view its details and caption options.
- From the document: Open the document that contains the video field, click the three-dots menu on the video input, then select Captions.
Types of captions
Auto-generated captions
For auto-generated captions, select the language of the spoken audio in the video. Mux will generate the captions automatically while it prepares the asset. The display name you choose is what will appear in the player when users select the caption track.
Auto-generate a single caption track
The auto-generated option should only be used to generate one caption track per asset. The language selected must match the spoken language in the video.
More details: Add auto-generated captions and use transcripts.
Custom captions
You can add custom captions and subtitles by providing a public URL to a .vtt or .srt file. Enter the URL in the caption configuration and set the caption name and language. You can host the file in Sanity's Media Library or any other public URL.
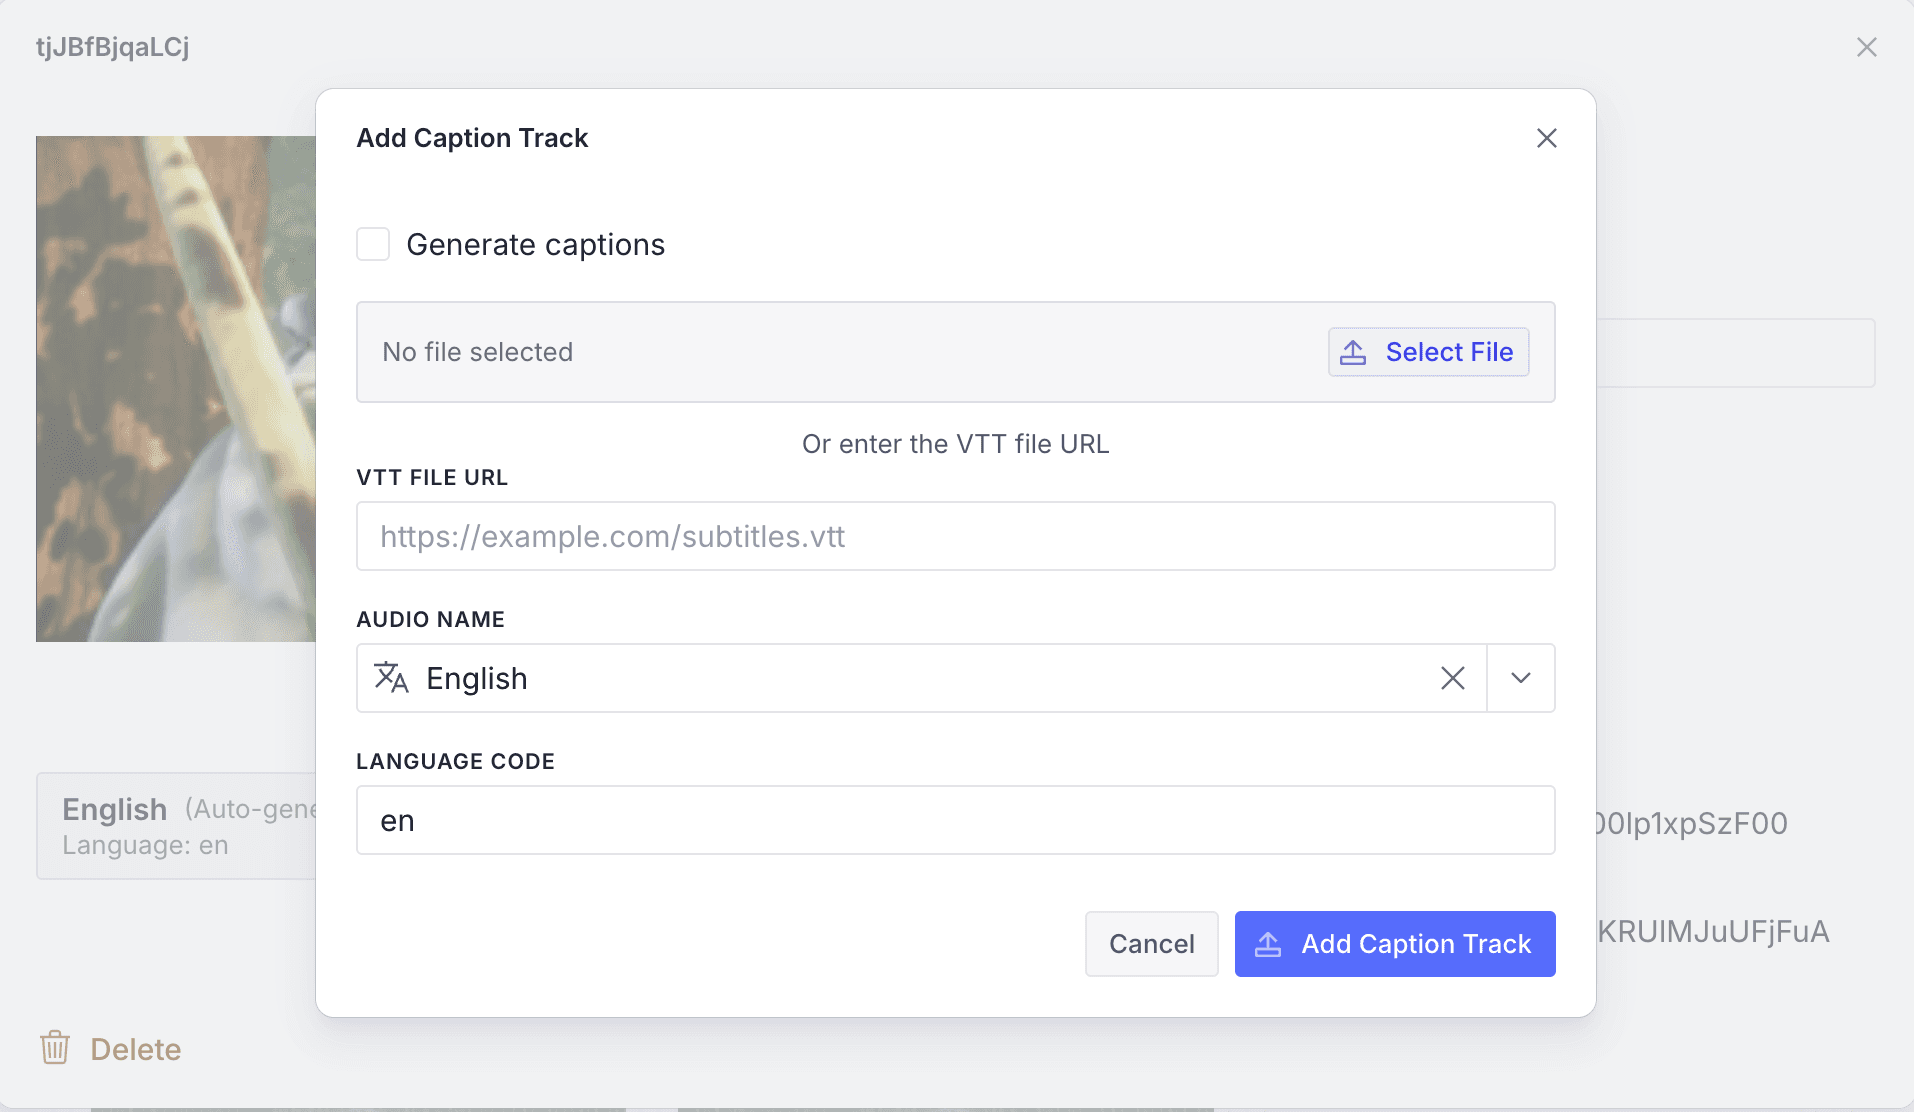
More details: Add subtitles/captions to videos.
Managing captions
Caption tracks can be added and removed at any time. Changes are reflected in the stored asset data. If you need to edit auto-generated captions, you can download the VTT file, make your edits, and re-upload it as a custom caption.
Set up playback
Preview your video
Integrate Mux Data
Release notes
Current release
v2.17.0
- Add watermark support